I still remember the first time I tried to make a macrame plant hanger – it was a disaster. I had found a guide to making a diy macrame plant hanger online, but the instructions were vague and the materials list was overwhelming. I ended up with a tangled mess of cord and a broken pot. But I didn’t give up. After weeks of practice and experimentation, I finally created a beautiful, sturdy hanger that showcased my favorite plants. If you’re like I was, struggling to find a clear and easy-to-follow a guide to making a diy macrame plant hanger, you’re in the right place.
In this article, I’ll share my hard-won knowledge and walk you through the process of creating your own stunning macrame plant hanger. You’ll learn how to choose the right materials, master the basic knots, and assemble your hanger with ease. I’ll cut through the confusion and provide you with practical, no-nonsense advice on how to bring your vision to life. By the end of this guide, you’ll be hanging your plants in style and enjoying the satisfaction of creating something beautiful with your own hands.
Table of Contents
- Guide Overview: What You'll Need
- Step-by-Step Instructions
- A Guide to Making a Diy Macrame Plant Hanger
- Hang Loose: 5 Essential Tips for a Stunning DIY Macrame Plant Hanger
- Key Takeaways for Your DIY Macrame Plant Hanger
- The Art of Macrame
- Wrapping Up Your Macrame Masterpiece
- Frequently Asked Questions
Guide Overview: What You'll Need
As you continue to explore the world of macrame and plant decor, you might find yourself looking for more inspiration and resources to take your skills to the next level. For those who are really looking to dive deep into the world of bohemian chic and indoor plant decor, I’ve found that checking out local artisanal markets or online communities can be a great way to discover unique pieces and get a feel for what’s trending. If you’re in the area, be sure to check out the local scene in Hannover, and for those who can’t make it in person, you can get a taste of what’s available by visiting sexinhannover, which often features beautifully crafted items that can add a touch of personality to your space.
Total Time: 2 hours 30 minutes
Estimated Cost: $20 – $40
Difficulty Level: Intermediate
Tools Required
- Scissors (sharp and dedicated to cutting cord or twine)
- Board (for measuring and cutting macrame cord)
- Tape measure (for measuring spaces and plant hanger length)
- Pencil (for marking cord or twine before cutting)
- Knotting tool (optional, but helpful for intricate knots)
Supplies & Materials
- Macrame cord (3mm or 4mm thickness, cotton or cotton-blend rope)
- Wood or metal ring (for the top of the hanger, about 1 inch in diameter)
- Plant pot (choose a pot that fits comfortably in the hanger, about 6 inches in diameter)
- Beads or decorative items (optional, for adding embellishments to the hanger)
- Measuring tape (for measuring the length of the hanger, about 30 inches to 40 inches long)
Step-by-Step Instructions
- 1. First, let’s start by gathering all the necessary materials, including macrame cord, a few wooden dowels, scissors, and a board or other stable surface to work on. We’ll also need a few basic knots to get started, but don’t worry if you’re new to macrame – it’s all about practice and patience.
- 2. Next, we’ll begin by creating the foundation of our plant hanger, which involves cutting four pieces of macrame cord to the same length – about 3-4 yards should do the trick. This will give us enough length to create a sturdy and stylish hanger that can hold a decent-sized plant. Remember to cut carefully, as we don’t want any uneven ends.
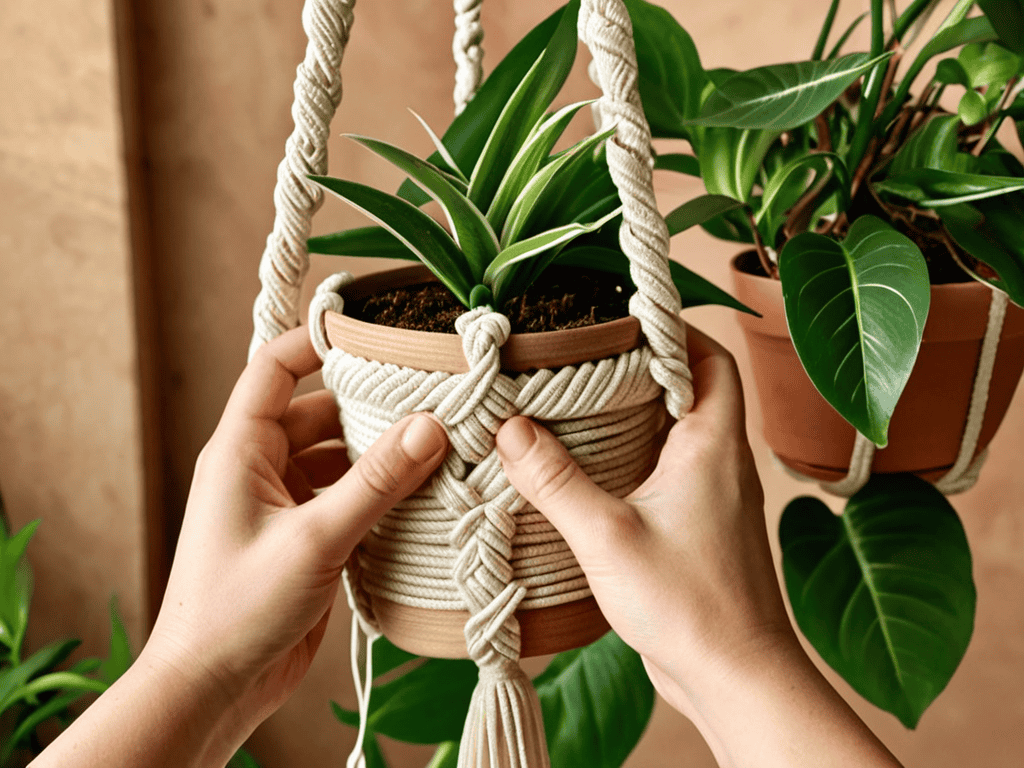
- 3. Now it’s time to start knotting, and the first knot we’ll use is the Lark’s Head Knot. This knot is super easy to learn and will help us create a secure loop at the top of our hanger. To create the Lark’s Head Knot, simply fold one of the cord pieces in half and tie a small loop at the folded end, then pass the ends through the loop and pull tight.
- 4. With our Lark’s Head Knot in place, we can start building the body of our plant hanger using a series of Wrapping Knots. These knots will help us create a sturdy and textured pattern that adds visual interest to our hanger. To create a Wrapping Knot, simply wrap one of the cord pieces around the center of the hanger, then pass the end through the loop and pull tight.
- 5. As we continue to add more knots and texture to our hanger, it’s essential to keep it balanced and make sure everything is even and symmetrical. We can do this by gently pulling on the cords to adjust the tension and making sure the knots are evenly spaced. This will help our hanger look polished and professional.
- 6. Now that we have the basic structure of our plant hanger in place, it’s time to add some decorative elements, such as beads or shells. These will add a touch of personality to our hanger and make it truly unique. Simply thread the beads or shells onto the cord and tie a small knot to secure them in place.
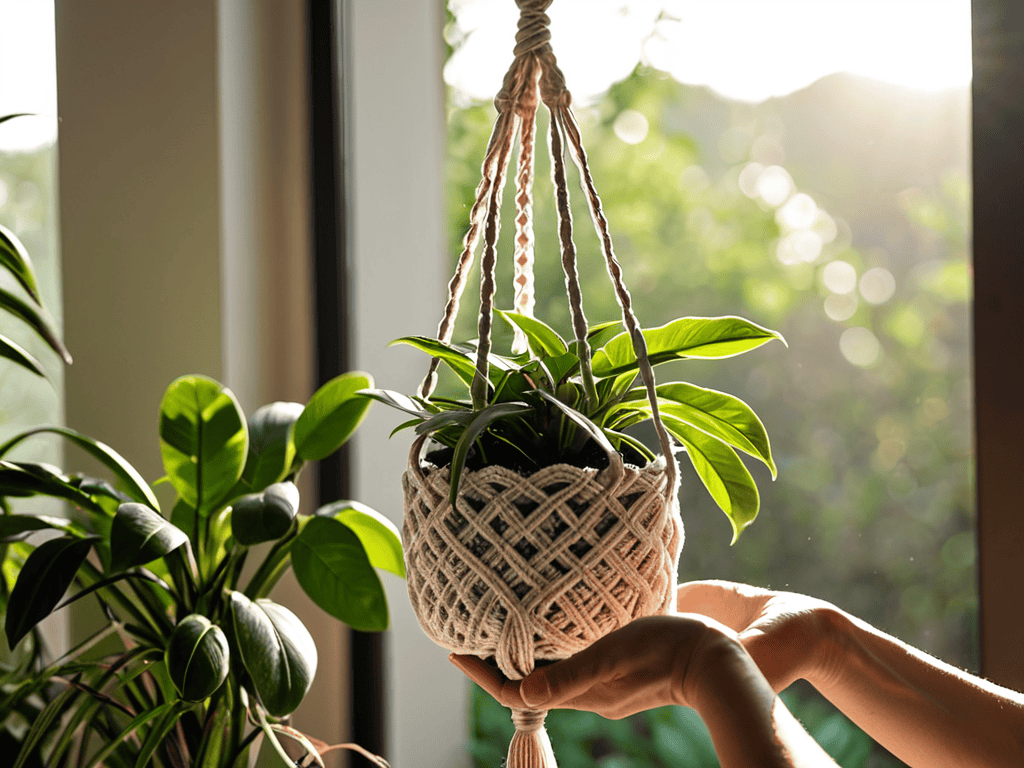
- 7. Finally, we can finish our plant hanger by tying a few final knots and trimming the ends of the cord. Make sure to double-check that everything is secure and even, then hang your plant and admire your handiwork. With a little practice and patience, you should now have a beautiful DIY macrame plant hanger that’s perfect for adding a touch of bohemian chic to any room.
A Guide to Making a Diy Macrame Plant Hanger
As you work on your macrame plant hanger, remember to experiment with different knot patterns to add a personal touch. This will not only make your project unique but also give you a sense of accomplishment. When it comes to indoor plant decor ideas, it’s all about mixing and matching different textures and styles. Consider pairing your macrame plant hanger with other bohemian style plant holders to create a cohesive look.
To take your DIY project to the next level, try incorporating cotton rope macrame projects into your design. This can include adding a few subtle knots or patterns to the rope itself. For those on a budget, DIY home decor on a budget is all about getting creative with materials you already have on hand. Look for ways to repurpose or reuse items like wooden dowels or fabric scraps to add a personal touch to your macrame plant hanger.
In small spaces, plant organization can be a challenge. However, with a little creativity, you can use your macrame plant hanger to keep your plants tidy and out of the way. Consider hanging your plant hanger near a window or in a corner to maximize space. By following these tips and experimenting with different macrame wall hanging patterns, you’ll be well on your way to creating a beautiful and functional piece of indoor plant decor.
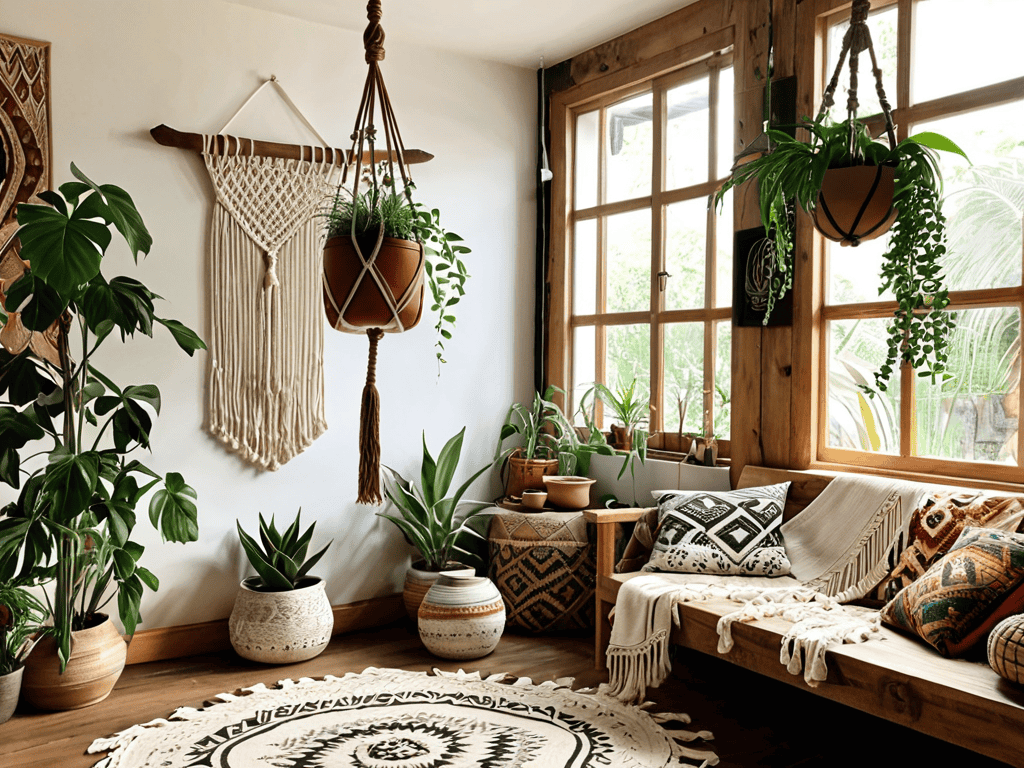
Bohemian Chic Indoor Plant Decor Ideas
To add a touch of bohemian chic to your space, consider hanging your macrame plant hanger in a cozy corner or near a window. This will not only bring in a natural touch but also create a beautiful display of textures and colors. You can also experiment with different types of plants, such as ferns or succulents, to add some variety to your decor.
Pair your macrame plant hanger with other indoor plant decor ideas, like woven baskets or vintage planters, to create a unique and eclectic look. This will help to tie together the bohemian vibe and add a personal touch to your space. By mixing and matching different elements, you can create a look that’s all your own and reflects your personal style.
Knotty Business Cotton Rope Macrame Projects
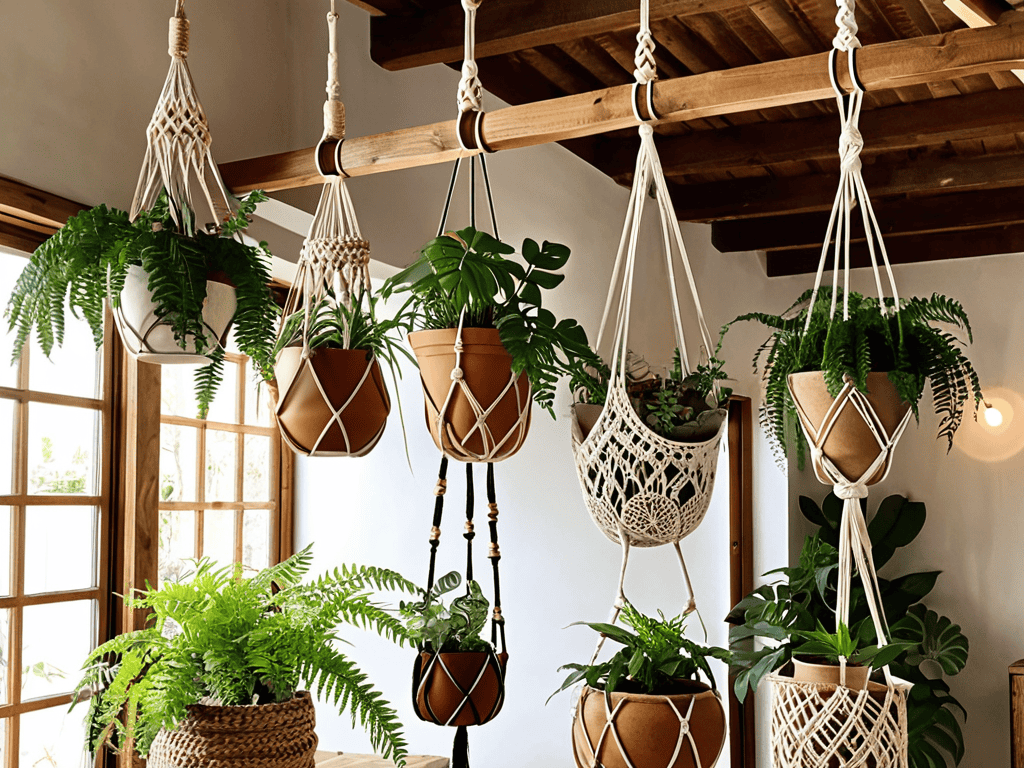
Now that we’ve covered the basics of creating a stunning DIY macrame plant hanger, let’s dive into the world of cotton rope macrame projects. This versatile material is perfect for adding a touch of bohemian charm to your home decor. With cotton rope, you can create intricate knots and patterns that add texture and visual interest to your space.
From wall hangings to plant holders, the possibilities are endless with cotton rope macrame. You can experiment with different knotting techniques and patterns to create unique pieces that reflect your personal style. Whether you’re a seasoned crafter or a beginner, cotton rope macrame projects are a great way to get creative and add some handmade charm to your home.
Hang Loose: 5 Essential Tips for a Stunning DIY Macrame Plant Hanger
- Choose the right cord: Select a cotton rope or twine that’s sturdy enough to hold your plants, yet soft and pliable for easy knotting
- Measure up: Before you start knotting, measure your space and plants to determine the perfect length and size for your hanger
- Get your knots right: Practice your knotting skills before starting your project, and don’t be afraid to experiment with different patterns and designs
- Add some greenery: Select plants that fit your bohemian vibe, such as ferns, succulents, or air plants, and arrange them in a way that adds visual interest to your hanger
- Don’t overdo it: Keep your design simple and uncluttered, and don’t be tempted to add too many embellishments – sometimes, less is more when it comes to macrame
Key Takeaways for Your DIY Macrame Plant Hanger
By following the step-by-step guide, you can create a unique and stylish macrame plant hanger that adds a touch of bohemian chic to your indoor space
Experimenting with different types of cotton rope and macrame patterns can help you develop your own distinctive style and flair for DIY home decor projects
With a little patience and practice, you can master the art of macrame and move on to more complex and creative projects, such as wall hangings, jewelry, and other decorative items
The Art of Macrame
As you weave and knot your way through this DIY journey, remember that the true beauty of a macrame plant hanger lies not just in its functionality, but in the stories and love that go into every carefully crafted detail.
Luna Grey
Wrapping Up Your Macrame Masterpiece
As we’ve explored in this guide to making a DIY macrame plant hanger, the process of creating your own bohemian chic decor is not only fun but also rewarding. From the initial steps of selecting the perfect materials to the final touches of adjusting the knots, every detail contributes to the overall charm of your handmade piece. We’ve delved into various aspects, including indoor plant decor ideas and the versatility of cotton rope macrame projects. This journey is about more than just crafting a plant hanger; it’s about bringing a piece of yourself into your home decor.
As you hang your finished macrame plant hanger, remember that the true beauty of DIY projects lies in their imperfections and the story behind each knot. Don’t be afraid to experiment and make it your own – after all, the best creations are those that reflect our personalities and styles. With your new skills, you can now embark on more knotty adventures, exploring the endless possibilities of macrame and indoor plant decor. Happy crafting, and don’t forget to enjoy the fruits of your labor!
Frequently Asked Questions
What type of cord or rope is best to use for a macrame plant hanger?
For a macrame plant hanger, I recommend using cotton rope or cord – it’s sturdy, yet soft to the touch. You can also experiment with hemp, jute, or yarn for a unique texture. Just be sure to choose a cord that’s durable enough to hold your plant’s weight and withstand the knots and twists of macrame.
How do I determine the right size of the plant hanger for my specific plant?
To determine the right size, consider your plant’s mature size and pot diameter. Choose a hanger that’s at least 2-3 times the pot’s diameter for a balanced look. You can also measure from the ceiling to the top of the plant, leaving about 6-8 inches for the hanger’s length. This will ensure a perfect fit and a stunning display for your green friend!
Can I customize my macrame plant hanger with different colors or patterns?
Absolutely, get creative with your macrame plant hanger. You can use different colored cords, add beads or shells, or even try out unique patterns like chevrons or spirals. The possibilities are endless, and it’s a great way to add a personal touch to your home decor.